Enabling FortiGate SSL MITM inspection
Gaining visibility to the other 80% of your traffic for your 3rd party network tooling
SSL inspection is one of the things that people should consider, especially places that have inspection tools like an NGFW on their edge. Any time encrypted traffic is crossing a security device, unless you are able to see inside the encryption traffic load, you are limited in your visibility and your inspection tooling is effectively useless against that encrypted traffic.
FortiGates have the ability to do SSL inspection combined with their internal detection mechanisms. Since 6.0 they have also had the ability to send decrypted copies of that data to another interface so you can use that data-stream in your other network analytics which will be the subject of a future post. Because of this, and I want to spend some time working with security onion, We are going to send an unencrypted MITM stream to our Security Onion device. this
SSL inspection isnt right for everyone or every environment. There are things to weigh and pros/cons to assess. PROs:
- SSL inspection will give you access to otherwise encrypted/invisible traffic.
- many web applications leverage SSL. without inspecting it, controlling this traffic is impossible.
CONs:
- Traffic is often encrypted for a reason, such as trust between a client and server. You are intentionally breaking that trusted connection
- You cannot SSL inspect all traffic. There are certain applications that use a technique called “certificate pinning” which prevent SSL inspection from functioning. some examples of this include:
- GotoMeeting
- OneDrive
- Skype
- Microsoft Updates (Windows)
- Apple Updates (MacOS/iOS)
- Dropbox
- May have a significant impact on system performance
- If you are sending unencrypted data-streams across a network, anybody who can read network packets could read the unencrypted data.
In our example today we are not going to be sending unencrypted data to separate tooling, that will follow in another post.
In order to do SSL inspection, we need to have a certifying authority that we can use to intercept traffic to/from the server on behalf of the clients. Our firewall will effectively perform a “Man in the middle” against the traffic flow using the certificate we are about to generate. We could just use the certificate that the FortiGate comes with but as a rule I NEVER use someone elses certificate. You don’t know where that private key has been.
To build our CA specifically for this lab, I am just going to use easyRSA. We will set up a proper Certifying Authority for the lab another time. This is just for demo purposes, and in practice I would deploy a proper certifying authority using Microsoft CA, OpenSSL/LibreSSL, or even something like a FortiAuthenticator in smaller environments.
Creating our Certifying Authority (CA)
We don’t want to be using a root CA for this, we would rather use an intermediate certificate. This makes it much easier to rotate the MITM certificates in the event you have to replace a firewall, or hardware goes missing. This is why we are building our Root separately.
Since im using kali in WSL, we can just install easy-rsa using apt
sudo apt update
sudo apt install easy-rsa
We then create a ca directory just so we don’t mess with anything and we can clean up easily afterwards. We also initialize the PKI folder structure.
Once your folder structure is created you can build your ca. it will ask you for a name for your CA, which you can name whatever you like. Unlike node or leaf certificates, the name of the certificate doesn't have to match the use case. Just name it something friendly so you can easily recall what it is when you import it to your trusted certificate list.

```bash
/usr/share/easy-rsa/easyrsa build-ca
Your certificate will be created and we can review the contents
openssl x509 -in pki/ca.crt -noout -text
Because the certificate is self-signed, the subject and the issuer will be the same. The most important part of this configuration is that in the x509 basic constraints you will see CA:TRUE. This flags this certificate as being permitted to issue sub-certificates.
From here we can configure our FortiGate to inspect traffic by creating a request on our FortiGate and then signing it in our easy-rsa directory.
Trust Root CA on Client
From your easy rsa folder, grab a copy of your ca.crt file. It should be located at ~/ca/pki/ca.crt Since im doing this from inside WSL, i need access to the certificate files in windows so we can use the explorer.exe shell call
cd ~/ca/pki/ca.crt
explorer.exe .
This works for me in Ubuntu for WSL, however in Kali for WSL I have to browse to the directory manually in windows explorer. Open \\wsl$\kali-linux\home. You MAY have permission errors doing it this way if your files are set to mode 700 so you will want to copy the ca.crt file to another directory and make it world readable. Note this is the CA public key, so this is definitely not a security concern even if this wasnt a Lab environment.
Once you have your ca.crt file, you can copy it to your client and then install it as a trusted Root CA.
- Find your ca.crt file, copy it to your client.
![]()
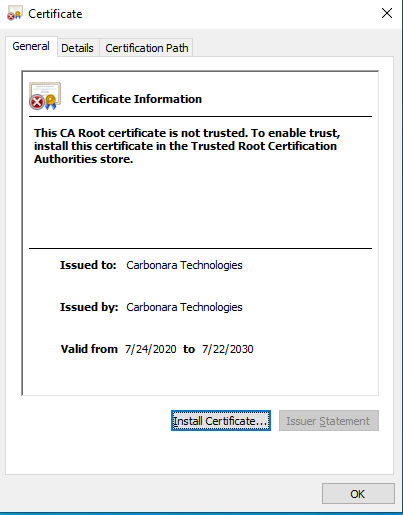
- Double-click the certificate to open the certificate details. Click
install certificate...to install as root![]()
- Install for local machine. You will need admin privileges
![]()
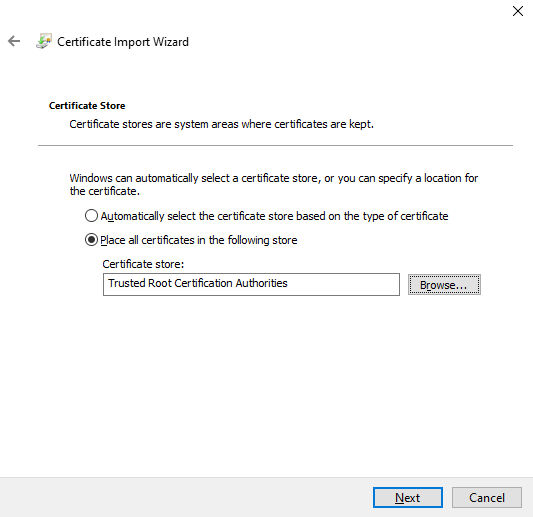
- Select
Place all certificates in the following store. SelectBrowseand then pickTrusted Root Certification Authorities. SelectNextandFinish.![]()


You now have the Certificate trusted in the client PC
Configuring our FortiGate
Next we need to generate a request for our certificate for SSL. When you are generating a certificate in a FortiGate, its actually in a strange place in the CLI. in the gui its in System > Certificates. In the cli its under exec vpn certificates. Even though we are technically building a Certifying authority, we want local certificate type. This is because the CA certificate type does not allow you to upload a private key. If a local certificate has CA:TRUE and you have uploaded the private key, the FortiGate will automatically categorize the certificate as a Local CA Certificate.
Generating and Signing your CSR
SSH into your FortiGate
#exec vpn certificate local generate rsa <certificate friendly name> <keysize 1024/2048/4096> <Certificate subject name> <Country> <Province/state> <City> <organization> <organizational unit> <email> <Subject alternative name>
exec vpn certificate local generate rsa "Carbonara SSL Inspection" 2048 "FortiGate SSL Inspector" CA ON Toronto "Carbonara Technologies" "InfoSec" admin@carbonara.tech

#show your CSR
#show full vpn certificate local <friendly name used above>
show full vpn certificate local "Carbonara SSL Inspection"
copy everything between -----BEGIN CERTIFICATE REQUEST----- and -----END CERTIFICATE REQUEST----- and paste it into a request file in your easy-rsa requests directory
cd ~/ca
echo "<PASTE CSR HERE>" > ~/ca/pki/reqs/FortiGate.req

/usr/share/easy-rsa/easyrsa sign-req ca FortiGate
yes
You should now have a certificate in ~/ca/pki/issued/FortiGate.crt which we can now import back to the FortiGate
Copy the certificate between (and including) the -----BEGIN CERTIFICATE----- and -----END CERTIFICATE----- flags.
SSH into your FortiGate. don’t forget the quotes (") around the certificate contents when pasting into the FortiGate
ssh admin@FortiGate
  config vpn certificate local
    edit <Certificate friendly name>
      set certificate "<PASTE CERTIFICATE>"
    next
  end
exit
We now have a intermediate certificate imported into your FortiGate so we can trust it on our endpoints.
Create SSL Inspection profile
In the FortiGate we now need to configure an SSL inspection profile to actually do the inspection.
I usually clone the default deep-inspection profile so that I automatically get the exemption list which will help us avoid breaking EVERY application, although the 6.0 SSL exemption is far from complete.
For convenience you can copy my SSL inspection profile. Don’t forget to change the name of your certificate to be the friendly name you used when generating the CSR.
Assign SSL inspection profile to firewall policy
For this step, I always create a specific firewall policy to assign the inspection.
ssh admin@fortigate
  config firewall policy
    edit 0
        set srcintf "trust"
        set dstintf "virtual-wan-link"
        set srcaddr "dev-win10"
        set dstaddr "all"
        set action accept
        set schedule "always"
        set service "ALL"
        set utm-status enable
        set logtraffic all
        set av-profile "default"
        set webfilter-profile "default-flow"
        set ips-sensor "protect_client"
        set application-list "default"
        set profile-protocol-options "custom-default"
        set ssl-ssh-profile "carbonara-inspect"
        set nat enable
    next
  end
exit
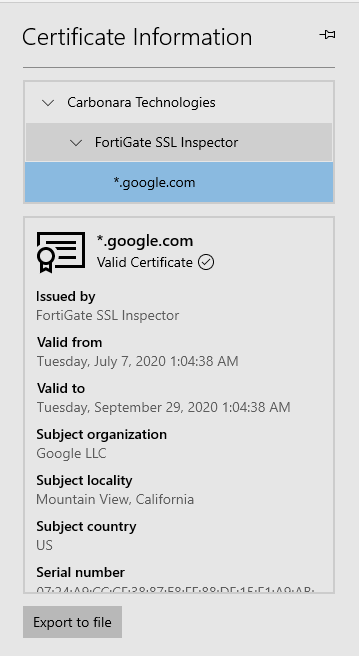
Now we open up a website using our web browser and go to any https encrypted website I am using YouTube for this. If you look up the certificate that was used to sign the connection you will see that it is in fact a valid certificate for YouTube however it has been signed by your certificate that you created, and you aren’t getting any certificate warnings.
Testing SSL inspection with App Control and Antivirus
Since we have MITM working, load up a video on YouTube. You will not only be able to see the YouTube session in the FortiView > Cloud applications of your FortiGate and FortiAnalyzer, but if you drill into it, you will be able to see video titles.


There is a lot more visibility that we now have. To test Antivirus inside SSL we download the https eicar antivirus test file. The Eicar antivirus test file is a benign file, with a specific ASCII string in it, which many antiviruses contain signatures against, which is useful if you want to test an antivirus tools' ability to inspect specific content. Here

Next Steps
We will be doing another post where we take the SSL inspection/MITM that we have accomplished it here and pipe it to a 3rd party tool like Security Onion so we can do long term packet storage and analysis.
Matt
Security Architect and TechnoHobbiest
My professional interests include information security, free and open-source technologies, and cloud services.